Dive into the world of creativity and self-expression with DIY jewelry making. Whether you’re a fashion enthusiast or a crafting novice, learning how to craft your own jewelry opens up endless possibilities to personalize your style and create meaningful gifts. This article will guide you through simple, step-by-step instructions to transform ordinary materials into stunning pieces of jewelry. Prepare to unleash your inner artist and add that personal touch to your wardrobe!
Making DIY jewelry involves selecting materials like beads, wire, and tools, then using techniques such as beading, wire wrapping, and knotting to create unique pieces. Start with easy projects like bracelets or earrings to build your skills.
Key Takeaways
- DIY jewelry making is not just a hobby; it’s a way to express your unique style and creativity.
- Starting with simple projects like beaded bracelets or wire-wrapped earrings can build your confidence.
- Materials can be as simple as beads, wire, and basic tools you might already have at home.
- Personalization is key. DIY jewelry allows for endless customization to match your taste or make thoughtful gifts.
- Skills development through practice. The more you create, the better your craftsmanship will become.
- Remember, every piece you make is a step towards mastering the art of jewelry making.
DIY Jewelry Projects for Beginners
Before diving into the projects, gather some basic supplies: beads, wires, pliers, and clasps. These tools are your entry ticket to the world of jewelry making.
Beaded Bracelets
- Materials: Choose a variety of beads in different colors and sizes along with elastic cord or wire.
- Process: String the beads onto your chosen material, experimenting with patterns until you find the perfect design.
- Tip: Use a bead board to layout your design before you start.
Simple Earrings
- Materials: Ear wires, beads, headpins.
- Process: Thread beads onto headpins, create a loop at the top, and attach to the ear wires.
- Variation: Try different bead combinations or add charms for a personal touch.
Wire-Wrapped Pendants
- Materials: A stone or crystal, wire, chain.
- Process: Wrap the wire around the stone in a decorative pattern. Attach to a chain for a stunning necklace.
- Tip: Use pliers for tighter wraps and neater loops.
Charm Necklaces
- Materials: Chain, jump rings, charms.
- Process: Attach charms to the chain with jump rings for a personalized necklace.
- Idea: Collect charms that represent your interests or memorable moments.
Button Bracelet
- Materials: Elastic cord, assorted buttons.
- Process: Thread buttons onto the cord, overlapping slightly for a full look.
- Creative Twist: Mix and match colors and sizes for an eclectic effect.
Tassel Earrings
- Materials: Embroidery thread, earring hooks, jump rings.
- Process: Wrap thread around a card, tie off one end, and cut the other. Attach to earring hooks with jump rings.
- Style Tip: Coordinate the color with your outfits for a chic look.
Enhancing Your Skills
As you progress, try experimenting with different materials and techniques such as knotting, weaving, and even metalworking. Each project not only adds to your collection but also enhances your skill set, allowing for more complex and intricate designs in the future.
Starting with these beginner projects, you’ll quickly learn the basics of DIY jewelry making. The key is to practice, be patient with yourself, and let your creativity flow. Happy crafting!
This outline provides a structured approach to introducing readers to the world of DIY jewelry making, with a focus on projects that are accessible to beginners. By following these guidelines, you can create content that is engaging, informative, and inspirational, encouraging readers to explore their creative potential and start making their own jewelry.
Unique DIY Jewelry Making Ideas
Exploring the realms of DIY jewelry making opens up a universe of creativity, allowing you to craft unique pieces that reflect your personal style. From the elegance of lace to the versatility of bracelets, there’s something for every skill level and taste.
Lace Ring
Crafting a lace ring combines the delicate beauty of lace with the fun of DIY jewelry making. To create this dainty piece, you’ll need ribbon lace and fabric stiffener. The process involves cutting a small piece of lace, applying fabric stiffener to give it shape and durability, and then molding it into a ring. Once dry, you’ll have a beautiful, lightweight ring that adds a touch of elegance to any outfit. It’s a perfect project for those looking to make a subtle yet stunning fashion statement.
How to Make a Bracelet
Bracelets are incredibly versatile and offer a canvas for endless creativity. Here, we delve into various techniques and styles, ensuring there’s a project for everyone.
Leather Wrap Bracelet
A leather wrap bracelet is stylish and surprisingly easy to make. You’ll need a strip of leather, a button for the clasp, and optional beads for decoration. The beauty of this project lies in its simplicity and the room for customization. By adjusting the length of the leather, you can wrap it multiple times around your wrist, creating a layered look that’s both boho and chic.
Rhinestone and Rope Bracelet
Combine the rustic feel of rope with the sparkle of rhinestones to create a rhinestone and rope bracelet. This project requires rope, rhinestones, and some adhesive. By carefully attaching rhinestones to the rope and securing the ends with clasps, you’ll create a bracelet that’s both casual and glamorous, perfect for everyday wear or special occasions.
Safety Pin and Sequin Bracelet
For a touch of edgy glamour, try making a safety pin and sequin bracelet. You’ll need safety pins, sequins, and elastic cord. Stringing sequins onto the safety pins and then linking them together on the elastic cord creates a sparkling, stylish piece that reflects a bold, creative spirit.
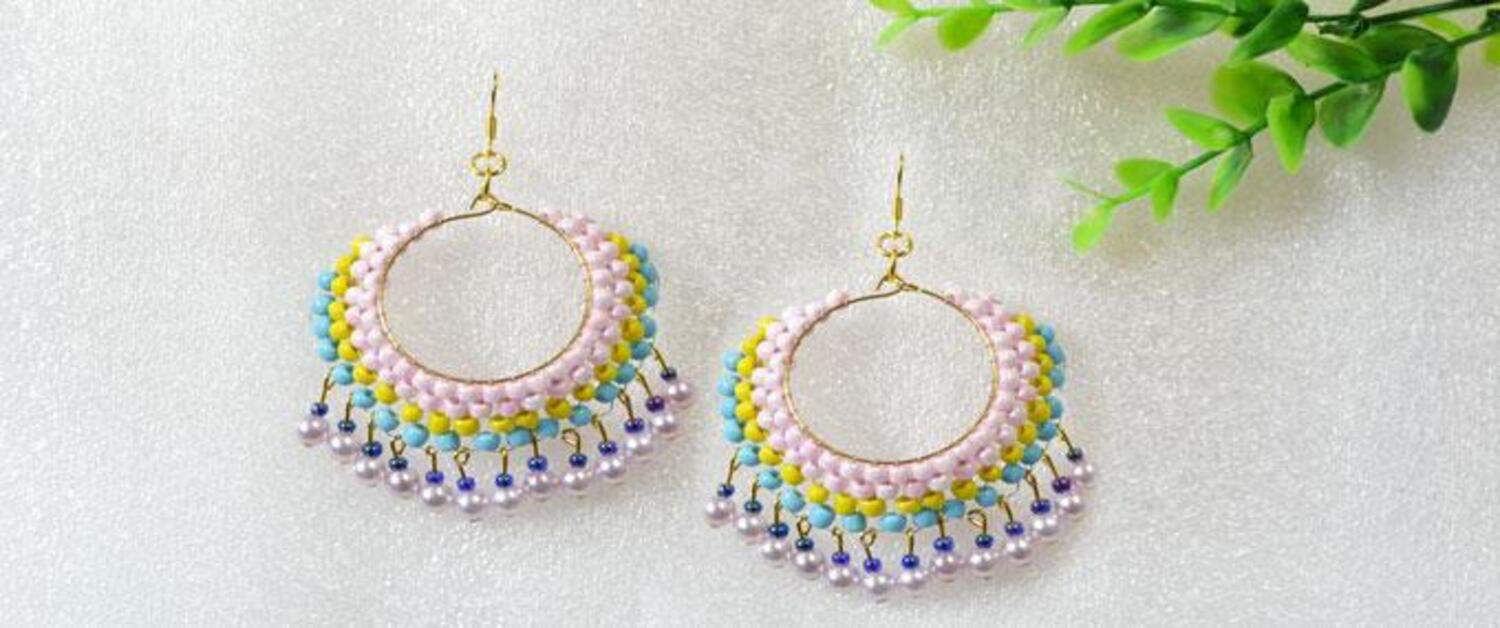
Jeweled or Beaded Bracelet
Whether you prefer the sparkle of jewels or the earthy feel of beads, creating a jeweled or beaded bracelet offers endless possibilities. This project can be as simple or complex as you like, involving stringing beads or jewels on wire or thread, securing with clasps, and adding personal touches with charms or spacers. It’s a great way to experiment with colors, textures, and patterns.
Pressed Penny Bracelet
A pressed penny bracelet is not only a piece of jewelry but a keepsake filled with memories. Collect pressed pennies from your travels or special occasions, punch holes in them, and link them together with jump rings. This bracelet tells a story, making it a meaningful project that celebrates your experiences.
Conclusion
Embarking on the journey of DIY jewelry making not only uncovers a world of creative potential but also connects us to the timeless tradition of crafting by hand. Each piece we create is a testament to personal expression, a blend of imagination, and the tactile joy of bringing an idea to life. Whether it’s the simplicity of a lace ring, the eclectic charm of a pressed penny bracelet, or the elegance of a beaded masterpiece, DIY jewelry allows us to explore and express our individuality in endless, tangible ways.
As we wrap up this exploration, remember that the true beauty of DIY jewelry lies not just in the finished product but in the process itself. The act of creating, of transforming simple materials into something beautiful and meaningful, is where the real magic happens. It’s an invitation to slow down, to savor the moment, and to connect with the creative spark that resides in all of us.
As you continue on your DIY journey, may you find joy in every bead strung, every wire twisted, and every piece polished. Here’s to the beauty you’ll create and the stories you’ll tell through the art of handmade jewelry.
FAQ’s
What basic tools do I need for DIY jewelry making?
For most DIY jewelry projects, you'll need pliers (round-nose and flat-nose), wire cutters, and a variety of materials like beads, wires, and clasps. These tools allow for versatile crafting, from simple beaded bracelets to more complex wire-wrapped pendants.
How can I ensure my DIY jewelry lasts long?
Use quality materials and apply proper finishing techniques, like securing knots with clear nail polish and using jewelry pliers for tight wire wrapping. Storing your jewelry properly also helps prolong its life.
Can I make DIY jewelry with no experience?
Absolutely! Start with beginner-friendly projects like stringing beads or making simple earrings to gradually build your skills. There are plenty of tutorials and kits available for first-timers.
Where can I find inspiration for my DIY jewelry designs?
Look to fashion magazines, Pinterest, Instagram, and jewelry crafting blogs. Attending craft shows or workshops can also spark creativity and provide new ideas.
What's the best way to sell my DIY jewelry?
Online marketplaces like Etsy or Handmade at Amazon are great platforms. Social media channels, local craft fairs, and consignment with boutique stores also offer excellent opportunities to showcase and sell your creations.

I am Sammy and I blog at Live it. Love it. Make it. It is creative lifestyle blog run by best friends H and Sammy. Head over and follow our crafty adventures!