Feeling stifled by lingering smoke at home? Whether it’s to keep peace with roommates or just for a fresher indoor atmosphere, creating a DIY Smoke Buddy is your low-cost, high-efficiency solution. This guide dives straight into making your own smoke filter, turning necessity into a crafty endeavor. Perfect for any smoker looking to discreetly manage their aroma footprint.
To make a DIY Smoke Buddy, you’ll need a plastic bottle or toilet paper roll, dryer sheets, activated carbon, scissors, and rubber bands. Cut the bottom, fill it with dryer sheets and carbon, and secure with rubber bands.
Key Takeaways
The materials needed are simple and most are likely already in your home. Choosing between a plastic bottle and a toilet paper roll depends on what’s available and your preference for durability versus ease of assembly. 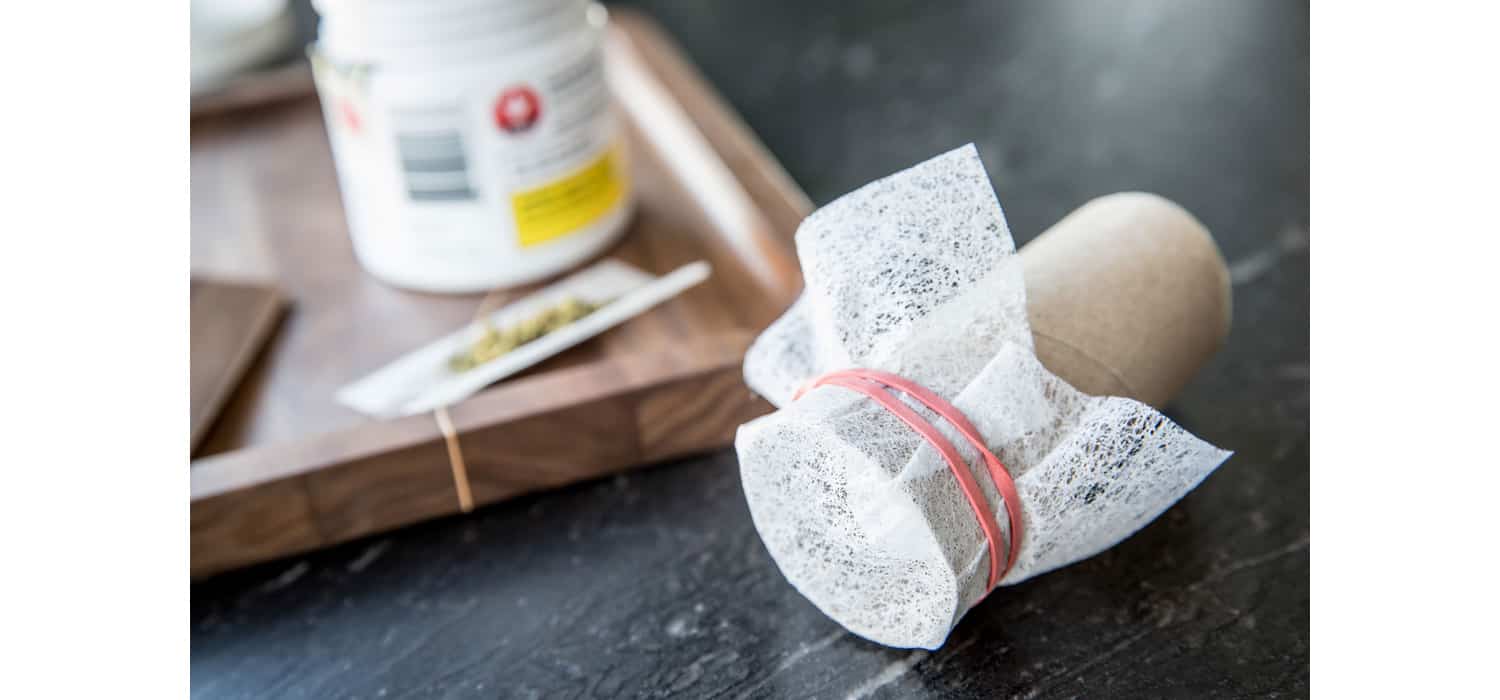 Constructing a DIY Smoke Buddy is straightforward, with maintenance playing a crucial role in its effectiveness and lifespan. Regular checks and replacements ensure optimal performance, making your smoking experience more discreet and enjoyable.
Materials Needed
Creating your own DIY Smoke Buddy is not only straightforward but also requires easily accessible materials.
What You’ll Need:
- Plastic Bottle or Toilet Paper Roll: These will serve as the body of your Smoke Buddy. A plastic bottle is more durable, but a toilet paper roll is a great quick fix.
- Dryer Sheets: These are key to filtering and freshening the air. Opt for scented sheets to add a pleasant aroma.
- Activated Carbon: This is used for its odor-absorbing properties, ensuring that your Smoke Buddy effectively neutralizes smoke smell.
- Scissors: To modify the bottle or to cut the dryer sheets to size.
- Rubber Bands or Tape: These will help secure the dryer sheets and ensure everything stays in place.
- Optional: Essential Oils: A few drops on the dryer sheets can enhance the fresh scent.
Step-by-Step Guide
Here is your step by step guide for “How to make a diy smoke buddy”.
Step-by-Step Construction
- Prepare the Container: If using a plastic bottle, cut the bottom off; for a toilet paper roll, ensure it’s empty.
- Add Dryer Sheets: Wrap a couple of dryer sheets around the bottom of the bottle or inside the roll. Secure with rubber bands or tape.
- Add Activated Carbon: For enhanced filtration, add a layer of activated carbon inside the container, between the dryer sheets.
- Secure the Top: If using a bottle, you can place a dryer sheet over the top and secure it with a rubber band. For a roll, ensure one end is fully covered.
- Optional Enhancements: Add a few drops of essential oil to the dryer sheets for a fresher scent.
Tips for Effective Usage and Maintenance
- Optimal Usage: Start with gentle puffs to test the efficiency of your Smoke Buddy. Ensure it’s held close during use to maximize smoke capture.
- Maintenance: Replace the dryer sheets and activated carbon regularly, based on usage frequency. A clean Smoke Buddy is more effective and hygienic.
- Longevity: Regular maintenance extends the life of your Smoke Buddy. However, if you’re using a toilet paper roll, consider upgrading to a more durable container over time.
Comparisons and Additional Insights
Let’s delve more in the comparisons and additional insights:
DIY vs. Store-Bought Smoke Filters
When deciding between DIY and store-bought smoke filters, it’s crucial to consider cost, effectiveness, and personal preference. DIY smoke buddies, made from household items like plastic bottles, dryer sheets, and activated carbon, offer a cost-effective solution with customizable filtration levels. However, their lifespan and efficiency can vary based on construction quality and materials used. Store-bought options, on the other hand, are designed for optimal performance with higher-grade materials, offering consistency and durability but at a higher price point. The choice often boils down to budget, convenience, and the level of customization desired. DIY solutions provide an immediate, personalized filter, while store-bought filters offer long-term reliability and ease of use.
Understanding Smoke and Odor Filtration
Smoke and odor filtration revolves around capturing particulate matter and neutralizing odors before they can spread. The key to effective filtration lies in the materials used. Activated carbon, commonly found in both DIY and commercial smoke buddies, excels at absorbing odors and chemicals, thanks to its large surface area and porous structure. Dryer sheets, while not as scientifically advanced, can mask odors with their fragrance and trap some smoke particles. The science of filtration also involves airflow and particle size; finer filters capture smaller particles but may restrict airflow, while coarser materials allow easier breathing but may be less effective at trapping tiny particulate matter. Understanding these principles can help in creating more effective DIY smoke filters and in choosing the best commercial options for your needs.
Conclusion
Crafting a DIY Smoke Buddy is a straightforward process that empowers smokers to maintain a discreet and clean smoking environment without breaking the bank. This guide has walked you through the necessary materials, a step-by-step construction guide, tips for effective usage and maintenance, and an insightful comparison between DIY and store-bought smoke filters. Understanding the science behind smoke and odor filtration enhances your ability to create an efficient and cost-effective solution tailored to your needs.
Whether you opt for the DIY route or decide on a store-bought smoke filter, the goal remains the same: to enjoy your smoking experience without leaving a lingering odor. DIY Smoke Buddies offer a personalized and immediate solution, allowing for creativity and flexibility in materials and design. On the other hand, store-bought options provide consistency, durability, and ease of use for those willing to invest a bit more.
In conclusion, creating your own Smoke Buddy is not only an enjoyable project but also an effective way to manage smoke and odors in your living space. With simple materials and a bit of ingenuity, you can ensure a more pleasant environment for yourself and those around you. The choice between DIY and commercial options depends on your preferences, budget, and how much you value customization over convenience. No matter your choice, the key is finding a solution that works best for you and your lifestyle.
Faq’s
Q: How do you make a smoke buddy without a toilet paper roll?
A: To make a DIY smoke buddy without a toilet paper roll, use a bottle, activated charcoal, and a dryer sheet. Cut the bottle, fill it with activated charcoal, cover one end with the dryer sheet, and secure it with a rubber band.
Q: How do you make a homemade smoke filter?
A: To make a homemade smoke filter, use a plastic bottle, activated charcoal, and a dryer sheet. Cut the bottle, fill it with activated charcoal, cover one end with the dryer sheet, and secure it with a rubber band.
Q: How do you make a homemade sploof?
A: To make a homemade sploof, use a plastic bottle, activated charcoal, and a dryer sheet. Cut the bottle, fill it with activated charcoal, cover one end with the dryer sheet, and secure it with a rubber band.
Q: What can you use instead of a smoke buddy?
A: Instead of a smoke buddy, you can use a homemade sploof made from a plastic bottle, activated charcoal, and a dryer sheet. Cut the bottle, fill it with activated charcoal, cover one end with the dryer sheet, and secure it with a rubber band.
Q: How do you make a smoke buddy with a toilet paper roll?
A: To make a smoke buddy with a toilet paper roll, you'll need activated charcoal and a dryer sheet. Fill the toilet paper roll with activated charcoal, cover one end with the dryer sheet, and secure it with a rubber band.

I am Sammy and I blog at Live it. Love it. Make it. It is creative lifestyle blog run by best friends H and Sammy. Head over and follow our crafty adventures!