Ever felt the thrill of launching something into the air, watching it soar? That’s the magic of a DIY catapult – a perfect blend of fun and science right at your fingertips. In this article, we’re diving into the how-to of crafting your very own catapult from simple materials. Ready to catapult your creativity to new heights? Let’s launch into this adventure together.
To make a DIY catapult, you need craft sticks, rubber bands, a bottle cap, and some creativity. Stack and bind the sticks, attach the cap, and voilà, your miniature medieval machinery is set to launch!
Also read: How To Displaying Wreaths At A Craft Show: Essential Tips
Building a Comprehensive DIY Catapult
Building your own DIY catapult is more than just crafting a toy; it’s a hands-on dive into the fundamentals of physics and engineering.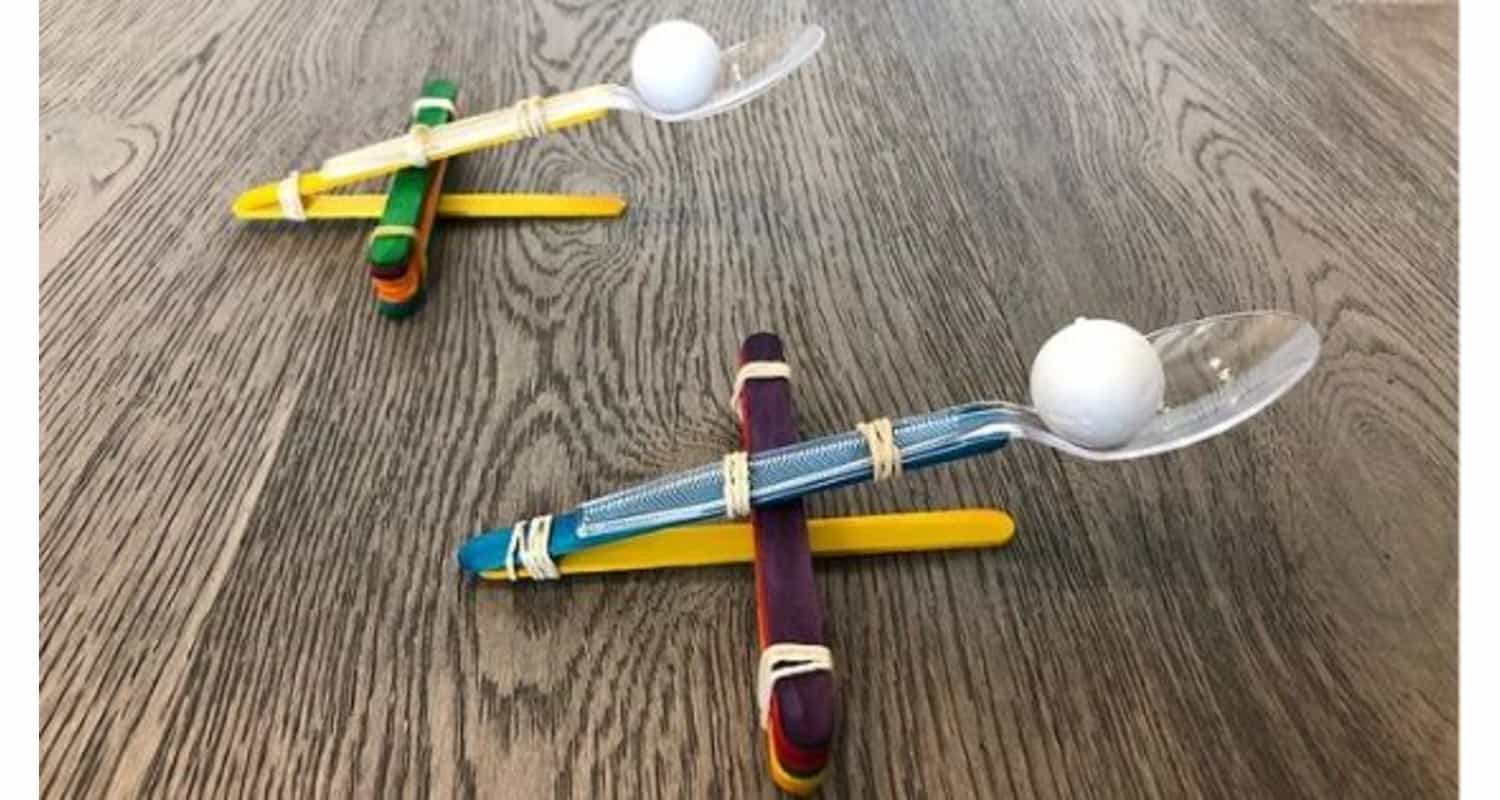 With basic materials like wood, rubber bands, and some tools, you embark on a project that not only tests your creativity but also your ability to solve problems and construct something tangible and functional. This project is perfect for anyone looking to engage with practical physics, have fun, or even start a unique DIY project.
Short Guide
- Gather Your Materials: You’ll need wood planks (2×4 and 4×4), PVC pipe, wood screws, a dowel, bungie cords, and a rubber cap. Tools include a power saw, drill, measuring tape, carpenter square, and compass.
- Create the Base: Using the wood planks, construct a stable base for your catapult.
- Assemble the Swinging Arm: This is the main component that will launch your projectiles.
- Install the Stopper and Tension Mechanism: Use bungie cords to create tension and a stopper to control the arm’s motion.
- Add the Projectile Basket: Attach a rubber cap to hold the projectiles.
This catapult isn’t just about launching objects; it’s a gateway to understanding mechanics and physics.
Key Takeaways
- Educational Value: Learn about physics, specifically the concepts of potential and kinetic energy, through a fun and engaging project.
- Skill Development: Enhance fine motor skills, problem-solving abilities, and understand the basics of construction and design.
- Creativity and Fun: This project is not just educational but also a lot of fun. It allows for creativity in design and in finding different projectiles to launch.
- Practical Application: Gain practical experience in building and engineering, useful in many areas of study and hobbies.
This project is a great way to engage with the principles of physics and engineering, offering both fun and learning opportunities. Whether you’re a parent looking for an educational activity with your kids or a DIY enthusiast eager to tackle a new project, building a DIY catapult can be a rewarding experience.
To build a comprehensive DIY catapult, you’ll need a mix of common hardware materials and tools. This project is not only about putting pieces together; it’s about understanding the mechanics behind the build. Here’s what you’ll need to get started:
Materials
- 2×4 and 4×4 Wood Planks: The backbone of your catapult, providing structure and support.
- PVC Pipe: For the swinging arm housing, ensuring it moves smoothly.
- Wood Screws: To secure all parts of the catapult firmly.
- Dowel: Acts as the pivot point for the swinging arm.
- Bungie Cords: The source of tension to launch projectiles.
- Rubber Cap: To hold the projectiles before launch.
Tools
- Power Saw and Table Saw: For cutting wood to precise measurements.
- Power Drill: To assemble the parts with screws.
- Measuring Tape and Carpenter Square: For accurate measurements and angles.
- Compass: To draw arcs for the swinging arm.
Gathering these materials and tools is the first step in creating a catapult that not only works well but is also safe to use. Remember, the quality of your materials and the precision in your build will significantly affect the performance of your catapult. Ensure you’re working in a safe environment, especially when handling power tools.
Each material and tool plays a crucial role in the construction process, from providing structural integrity to ensuring the moving parts operate smoothly. The bungie cords and rubber cap, while seemingly minor components, are crucial for the catapult’s functionality, affecting how projectiles are launched.
This project is an excellent opportunity to apply basic physics and engineering principles, offering a hands-on learning experience. Whether you’re a seasoned DIY enthusiast or a beginner looking to tackle a new challenge, building a DIY catapult promises a rewarding experience filled with learning and fun.
Also read: How To Display Art At A Craft Fair: Tips For A Captivating Booth
Step-by-Step Construction
Here is the step by step guide for “How to Make a DIY Catapult”:
Planning and Design
Begin by sketching your catapult design, focusing on dimensions and materials. Planning is crucial for understanding the physics behind the catapult, such as leverage, tension, and projectile motion. Consider the size of your base, the length of the swinging arm, and how you’ll incorporate the tension mechanism (bungie cords). Safety tip: Ensure your design is stable and robust to handle the stress of launching projectiles.
Building the Base
Use the 2×4 wood planks to construct a sturdy base. Measure and cut two pieces for the length and two pieces for the width, then secure them together using wood screws. The base must be solid and stable, as it supports the entire structure. Educational value: This step introduces basic carpentry skills and the importance of accurate measurement and angles.
Assembling the Swinging Arm and Housing
Craft the swinging arm from a 2×4 plank, ensuring it’s the correct length for your design. The housing, made from smaller wood pieces and PVC pipe, will hold the arm in place. Drill a hole through the arm and housing for the dowel, which acts as the pivot. Safety tip: Wear protective gear when drilling and cutting. Educational value: Learn about the mechanics of motion and how pivot points work.
Installing the Tension Mechanism
Attach bungie cords to the swinging arm and the base to create tension. The tension mechanism is what propels the projectile. Experiment with different bungie cord lengths and tensions to find the optimal launch power. Safety tip: Ensure the cords are securely attached to prevent accidents. Educational value: Explore potential and kinetic energy, and how they convert during the launch.
Creating the Projectile Basket
Fasten a rubber cap to the end of the swinging arm to hold your projectiles. This can be done with screws or strong adhesive. The basket should be securely attached and positioned to maximize launch efficiency. Safety tip: Make sure there are no sharp edges exposed. Educational value: Discuss trajectory and how angles affect the distance and accuracy of the launched projectile.
Testing and Refinement
Finally, test your catapult with safe, soft projectiles like marshmallows or pom poms. Observe how changes in tension, arm length, and projectile weight affect the launch. Use this phase to make any necessary adjustments to improve performance. Educational value: This step encourages critical thinking, problem-solving, and the scientific method as students hypothesize, test, and refine their designs.
Throughout the construction process, maintain a focus on safety, particularly when using tools and launching objects. This project not only provides a hands-on learning experience in physics and engineering but also cultivates skills in problem-solving, creativity, and teamwork.
Building and using a DIY catapult offers a wide array of educational benefits, touching upon various aspects of STEM (Science, Technology, Engineering, and Mathematics) education, while also honing precision and aim skills.
Also read: Creating Hand Tracing Art Ideas: Easy Techniques
Educational Benefits
Let’s talk about some of the educational benefits of “How to Make a DIY Catapult”:
Physics Fundamentals
The construction and operation of a catapult provide a practical application of physics principles such as potential and kinetic energy, projectile motion, and force. By adjusting the tension in the bungie cords or the angle of the launch, learners can explore how these modifications affect the distance and trajectory of the projectile. This hands-on experience helps demystify abstract physics concepts, making them more accessible and engaging.
Engineering and Design
Building a catapult from scratch involves critical thinking and problem-solving skills, as it requires learners to design, build, test, and refine their machines based on the principles of engineering. This process encourages creativity and innovation, as students must consider various factors such as materials, durability, and efficiency to create a functional catapult.
Mathematics Application
Calculating angles, force, and potential energy introduces practical applications of mathematics. Learners can measure the distance of their projectiles and use these measurements to calculate the catapult’s efficiency, applying mathematical formulas in a real-world context.
Also read: Transforming Old Items: Best Upcycle Ideas
Precision and Aim
Let’s talk about some of the precision and aim of “How to Make a DIY Catapult”:
Hand-Eye Coordination
Precision and aim are crucial for maximizing the effectiveness of a catapult. This involves adjusting the angle and force of the launch to hit specific targets or achieve maximum distance. Such activities enhance hand-eye coordination, as learners must carefully align their catapults and judge the necessary adjustments based on the results of their launches.
Understanding of Trajectory and Force
Through repeated experimentation, learners gain an intuitive understanding of how trajectory and force affect the outcome of their launches. This not only applies to the physical operation of the catapult but also contributes to a deeper understanding of these concepts in a broader scientific context.
Goal Setting and Achievement
Setting targets or specific goals for launches can turn the activity into a game, encouraging learners to improve their precision and aim. This aspect of the project promotes perseverance and patience, as achieving the desired results often requires multiple adjustments and attempts.
Conclusion
Embarking on the journey of building a DIY catapult serves as a powerful testament to the intersection of fun and education. This hands-on project not only brings to life the core principles of physics and engineering but also kindles the flames of curiosity and creativity within learners of all ages. Through the process of designing, constructing, and testing their catapults, individuals gain invaluable insights into the mechanics of motion, the importance of precision, and the thrill of achievement.
Moreover, the project underscores the significance of perseverance and adaptability, as each test and tweak brings one closer to their goal. Whether used as a tool for educational enrichment, a means to develop fine motor skills, or simply as a source of entertainment, the DIY catapult stands as a testament to the joys of learning by doing.
As we conclude, remember that the value of this project extends beyond the catapult itself. It’s a launchpad for inquiry, a catalyst for education, and a beacon of creativity. May your catapult not only soar through the skies but also elevate your understanding and appreciation for the simple yet profound principles that govern our world.
Also read: How To Make Shrinky Dink Earrings: Unique DIY Craft
FAQ’s
What materials are needed for a DIY catapult?
To build a DIY catapult, gather craft sticks, rubber bands, a plastic spoon or bottle cap for the basket, and objects like pom-poms for launching. This project blends physics and fun, demonstrating potential and kinetic energy.
How does a catapult work?
A catapult launches projectiles using stored energy from tension (rubber bands) or torsion (twisting materials). When released, this energy converts to kinetic, propelling the object forward. Understanding this showcases basic mechanical principles and energy conversion.
Can I make a catapult for a school project?
Absolutely! A DIY catapult is perfect for school projects, offering a hands-on approach to learning physics concepts like leverage, force, and trajectory. It encourages problem-solving and design skills, making learning interactive and enjoyable.
What safety precautions should I take when building a catapult?
Always wear safety goggles and be mindful of sharp tools. Ensure the catapult's structure is stable to prevent accidents. When launching, make sure the area is clear of people and fragile items to avoid injuries or damage.
How can I improve my catapult's accuracy and distance?
Experiment with the arm's length, the tension in the rubber bands, and the angle of launch. Adjusting these variables helps you understand the effects of force and trajectory on your catapult's performance, enhancing both accuracy and distance.

I am Sammy and I blog at Live it. Love it. Make it. It is creative lifestyle blog run by best friends H and Sammy. Head over and follow our crafty adventures!