Are you looking for a way to upgrade your bedroom without breaking the bank? A DIY tufted headboard could be the perfect solution! This article will guide you through the steps to create a stunning headboard that adds a touch of luxury to your space.
How to Make a DIY Tufted Headboard: Start with a plywood base. Cut foam to size and glue it to the plywood. Cover the foam with batting and fabric. Mark your tufting spots, then use a drill to make holes. Thread your tufting buttons through, pulling tightly to create the tufted effect.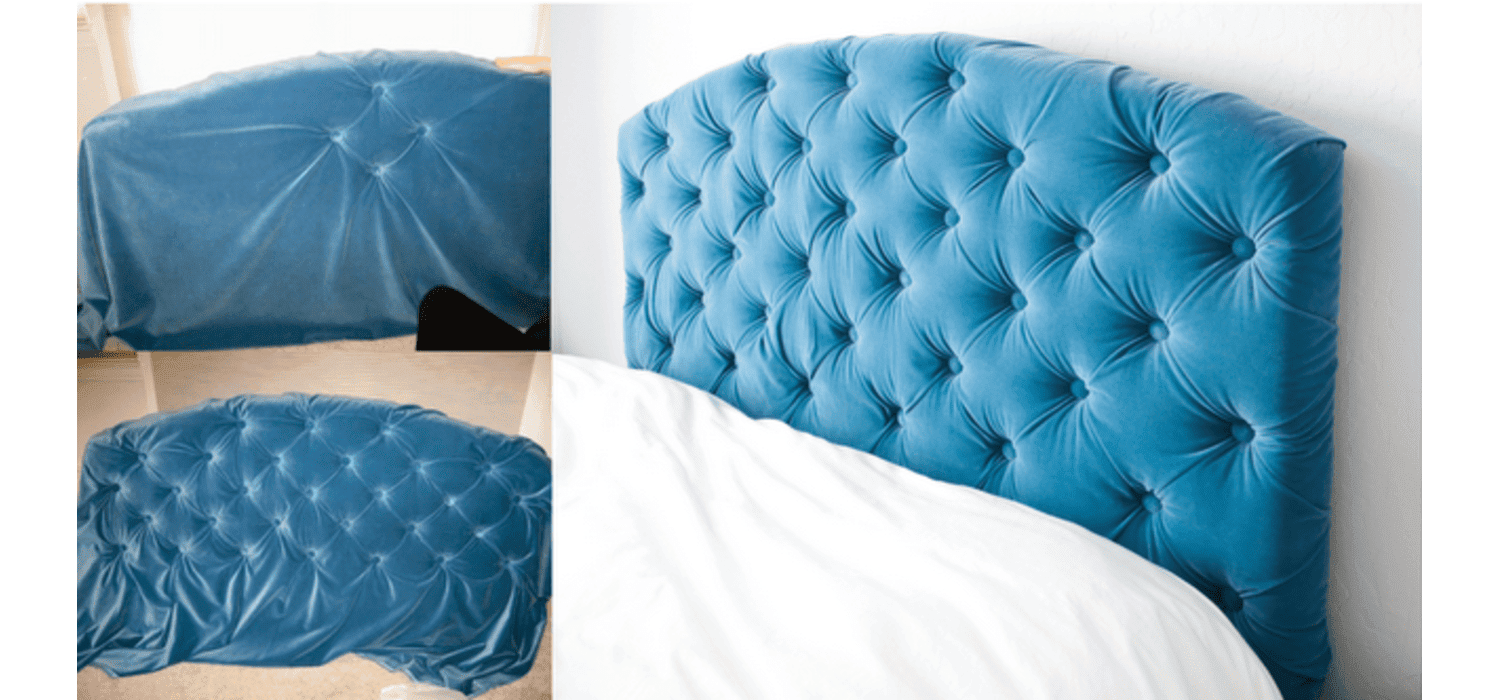
Don’t stop here! There’s more to discover about customizing your headboard to match your style. Plus, we’ve got tips to make the process smoother. Keep reading to transform your bedroom into a cozy, stylish retreat.
Key Materials Needed
When creating a DIY tufted headboard, you’ll need the following essential materials:
- Plywood: The backbone of your headboard. Choose a size that matches your bed’s width and desired height.
- Foam: This provides the plushness for your tufting. Opt for at least 2 inches thick for a comfortable feel.
- Fabric: Upholstery fabric is the best choice for durability and style. The amount you’ll need depends on your headboard size. For a queen bed, aim for about 6 yards .
- Buttons: These create the tufted effect. You can use regular buttons or cover them with fabric for a coordinated look.
- Tools: You’ll need a drill, staple gun, scissors, and a tufting needle.
When selecting fabric, consider the overall style of your room. Upholstery fabric comes in various textures and patterns, so choose one that complements your decor. The yardage required will vary based on your headboard’s dimensions and the fabric’s width. A general rule is to add an extra yard to your measurements for tufting and wrapping around the back.
Step-by-Step Construction
Building the frame is the first step in creating your DIY tufted headboard:
- Cut Your 2x4s: Measure and cut your 2x4s to the desired dimensions. For a queen-sized bed, you might want a frame that’s 62 inches wide and 50 inches tall. You’ll need two pieces for the height and two for the width.
- Assemble the Frame: Lay out the cut 2x4s to form a rectangle. Use wood screws to attach the corners together securely. This will be the skeleton of your headboard.
- Attach Plywood: Cut your plywood to match the dimensions of the frame. Place the plywood on top of the frame and use screws to attach it, ensuring it’s flush with the edges of the 2x4s. This creates a solid base for your tufting.
Adding Legs and Wings:
To give your headboard a more finished look and added stability, you can attach legs and wings:
- Legs: Determine the desired height of your headboard from the ground and cut two pieces of 2x4s accordingly. For example, if you want the headboard to be 60 inches tall from the ground, and your frame is 50 inches tall, cut the legs to be 10 inches each. Attach the legs to the bottom corners of the frame using screws or metal brackets. Make sure they’re perpendicular to the ground for stability.
- Wings: If you’re adding wings for a wingback headboard, cut two pieces of plywood to your desired height and width. The height should be the same as your headboard, and the width can be around 10-15 inches depending on your preference. Attach the wings to the sides of the headboard frame using screws. They should be at a slight angle (about 45 degrees) to create the classic wingback silhouette.
Assembly and Finishing Touches
Creating the tufted look involves several detailed steps:
Marking and Drilling Holes:
- Place your foam on top of the plywood base. Ensure it’s the same size as the plywood.
- Decide on the tufting pattern you want. A common choice is a diamond pattern.
- Use a ruler and a marker to mark where each button will be placed on the foam. Make sure the marks are evenly spaced.
- Drill holes through the foam and plywood at each mark. These holes are for threading the tufting buttons.
Attaching Foam, Batting, and Fabric:
- Apply spray adhesive to the plywood. Carefully place the foam on top, pressing down to ensure it sticks.
- Lay the batting over the foam. Pull it tight around the edges and staple it to the back of the plywood. The batting adds softness and helps smooth out the foam.
- Place your fabric face down on a flat surface. Put the headboard on top, with the foam side facing down.
- Starting from the center, pull the fabric tightly over the edges. Staple it to the back of the plywood. Work your way out to the corners, ensuring the fabric is smooth and wrinkle-free.
Creating the Tufts:
- Thread an upholstery needle with strong thread or fishing line. Attach a button to one end.
- Starting from the back, push the needle through one of the pre-drilled holes, through the foam, and out through the fabric.
- Pull the button tight against the fabric, creating a tuft. Make sure the button is secure and the tuft is the depth you want.
- Staple the thread to the back of the plywood to hold the tuft in place.
- Repeat this process for each hole, ensuring the tufts are evenly spaced and uniform.
By following these steps, you can create a beautiful tufted headboard that adds a touch of elegance to your bedroom. The key is to take your time, ensuring each tuft is perfect, and the fabric is smooth and tight.
Final Assembly:
After completing the tufting process, follow these steps to finalize your headboard:
Securing the Tufted Fabric:
- Examine the back of your headboard to ensure the fabric is tightly secured with staples. If any areas feel loose, add more staples to ensure the fabric is firmly attached to the plywood.
- Use scissors to trim any excess fabric or batting from the back of the headboard. This will give it a cleaner look and make it easier to attach to your bed frame.
Attaching Covered Buttons:
- If you haven’t already done so, use a fabric covering kit to cover your buttons with the same fabric used for the headboard. This will create a cohesive look.
- Thread a sturdy needle with strong upholstery thread. Tie a knot at one end of the thread and attach it to the back of a covered button.
- From the back of the headboard, push the needle through one of the pre-drilled holes to the front, pulling the button tight against the fabric to create a tuft.
- Secure the thread on the back of the headboard with a staple or a knot, ensuring the button stays in place.
Adding Finishing Touches:
- For an added touch of elegance, consider applying nailhead trim along the edges of your headboard. You can use individual nailheads or a continuous strip of nailhead trim.
- Measure the perimeter of your headboard and cut the nailhead trim to the appropriate length. If using individual nailheads, plan their placement so they are evenly spaced.
- Use a rubber mallet to gently hammer the nailheads into place, ensuring they are straight and evenly spaced for a professional finish.
Cost Analysis and Tips:
A DIY tufted headboard can be a budget-friendly alternative to store-bought options:
Cost Breakdown:
- The cost of materials can vary, but you can expect to spend around $30 for plywood, $40 for foam, $50 for fabric, $10 for buttons, $15 for batting, and $10 for miscellaneous items like staples and adhesive. This brings the total estimated cost to approximately $155.
- In contrast, purchasing a pre-made tufted headboard can cost anywhere from $200 to $600, depending on the quality and design.
Tips for Saving Money:
- Keep an eye out for sales or discounts on fabric and foam at your local craft or home improvement stores.
- Consider repurposing a piece of plywood or using leftover fabric from other projects to reduce costs.
- Borrow tools like staple guns or drills from friends or family members instead of buying new ones.
- Instead of buying a button covering kit, you can create your own covered buttons using fabric scraps and a simple needle and thread.
By carefully selecting materials and utilizing these tips, you can create a stylish and luxurious tufted headboard that enhances your bedroom decor without exceeding your budget.
Conclusion
Creating a DIY tufted headboard is a rewarding project that adds a touch of elegance to your bedroom. By following the steps outlined in this article, you can construct a beautiful headboard that enhances your decor and provides a comfortable backdrop for relaxation. Share your experiences and tips in the comments below to inspire others on their DIY journey.
FAQ Section
Can you make your own tufted headboard?
Yes, creating a DIY tufted headboard is a feasible project. With basic materials like plywood, foam, fabric, and buttons, you can construct a custom headboard to enhance your bedroom decor.
What material is best for a tufted headboard?
Upholstery fabric is the ideal choice for a tufted headboard due to its durability and wide range of styles. It ensures a professional finish and complements your bedroom's aesthetic.
How do you attach a tufted headboard to the bed?
A tufted headboard can be attached to the bed frame using brackets or bolts. Ensure it's securely fastened for stability and safety.
What kind of foam is used for tufted headboards?
High-density upholstery foam is recommended for tufted headboards. It provides the necessary firmness for tufting and maintains its shape over time.
How do you maintain a tufted headboard?
Regularly vacuum your tufted headboard with a soft brush attachment to remove dust. For stains, gently spot-clean with a mild detergent and water, avoiding harsh chemicals.

I am Sammy and I blog at Live it. Love it. Make it. It is creative lifestyle blog run by best friends H and Sammy. Head over and follow our crafty adventures!