Imagine transforming any room into a guest bedroom without losing precious space. That’s the magic of a Murphy bed. It’s not just furniture; it’s a space-saving marvel that folds away when not in use. In this guide, we’ll unlock the secrets to creating your own DIY Murphy bed, blending functionality with style.
To make a Murphy bed DIY, you’ll need tools, a kit, wood, and a weekend. Measure, cut, and assemble the frame; attach it to a wall-mounted mechanism. Add your mattress, and voilà!
Don’t stop here! Keep reading to learn the step-by-step process, helpful tips, and everything you need to ensure your DIY Murphy bed isn’t just functional, but a standout feature in your home.
Planning and Preparation
Before diving into your DIY Murphy bed project, proper planning and preparation are crucial. Here’s what you need to know:
Materials and Tools Required
To get started, you’ll need the following materials and tools:
- Bed Frame: Choose a sturdy frame that can be mounted to the wall.
- Mounting Kit: Essential for securing the bed to the wall.
- Cabinet or Closet: For storing the bed when not in use.
- Tools: You’ll need a screwdriver, drill, level, and measuring tape.
Design Considerations
When designing your Murphy bed, keep the following in mind:
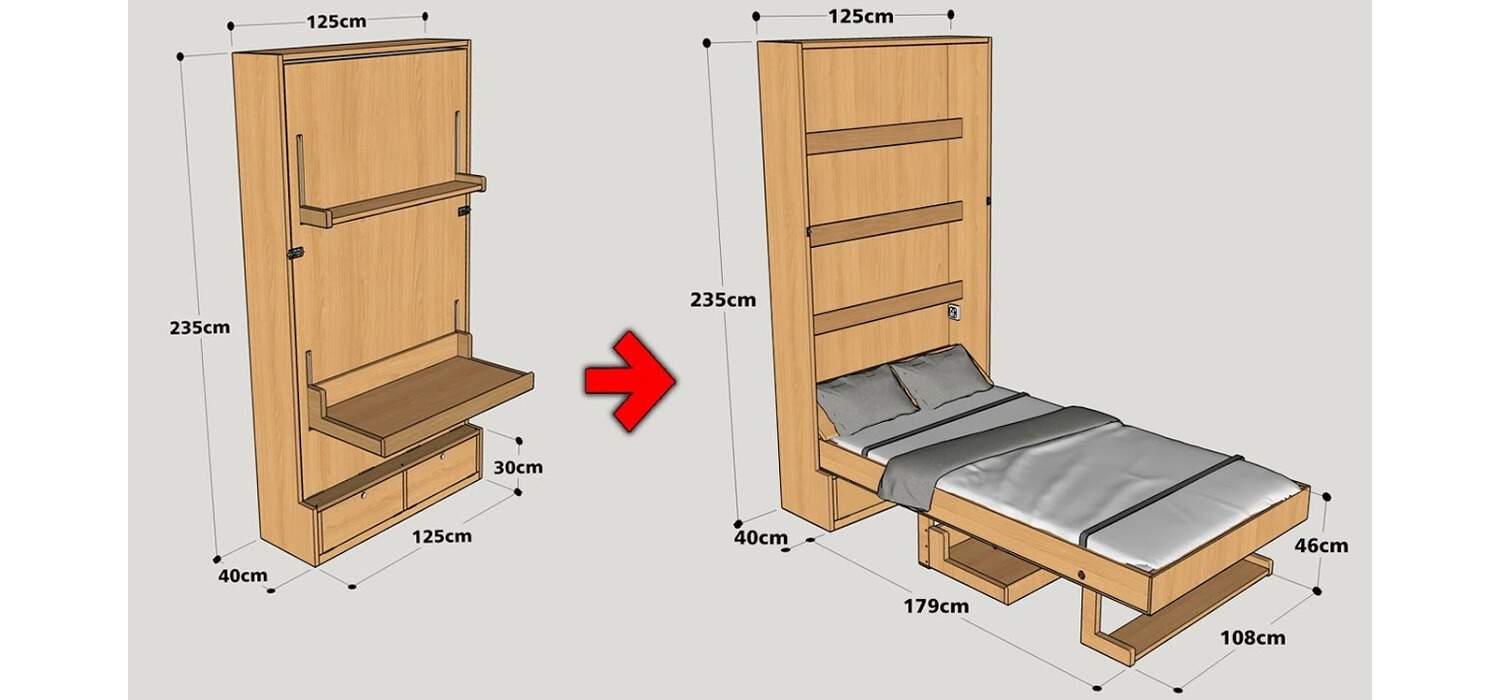
- Space: Measure the area where the bed will be installed. Ensure there’s enough room for the bed to fold down comfortably.
- Style: Match the bed’s design with your room’s decor. Consider the color, material, and overall aesthetic.
- Functionality: Ensure the bed is easy to pull down and put away. The mechanism should be smooth and user-friendly.
Building the Murphy Bed
Creating a Murphy bed involves several key steps, from constructing the frame to adding the final touches. Let’s dive into the details:
Constructing the Frame
Building a sturdy frame is the foundation of your Murphy bed project. Here’s how to construct the frame:
- Choose Your Materials: Opt for durable materials like hardwood or metal for the frame.
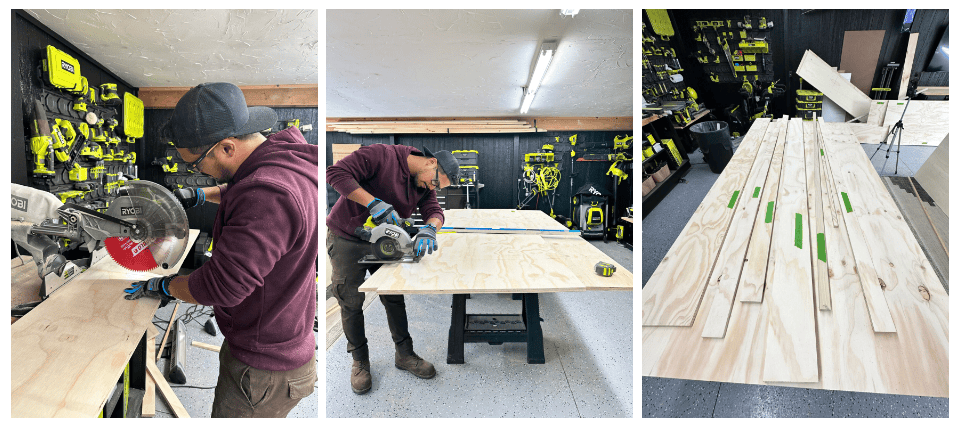
- Cut to Size: Based on your mattress dimensions, cut the frame pieces to size.
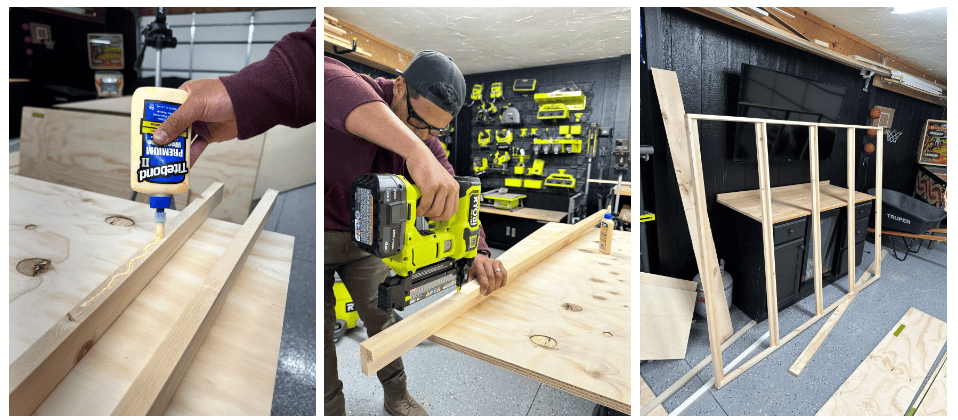
- Assemble the Frame: Use screws and brackets to assemble the frame securely.
- Attach the Murphy Bed Mechanism: Follow the manufacturer’s instructions to attach the mechanism to the frame. This is crucial for the smooth operation of the bed.
- Test the Mechanism: Ensure that the bed can be easily pulled down and lifted up.
Remember to take your time during this step to ensure a solid and safe construction.
Assembling the Cabinet and Paneling
Creating a cabinet for your Murphy bed not only hides the bed when not in use but also adds to the aesthetics of your room. Here’s how to assemble the cabinet and paneling:
- Design the Cabinet: Plan the dimensions of the cabinet based on the size of the bed frame and the available space in your room. Consider adding shelves or storage compartments for added functionality.
- Cut the Panels: Once you have your design, cut the wood panels for the cabinet sides, top, bottom, and back. Use a saw for precise cuts and sand the edges for a smooth finish.
- Assemble the Cabinet: Start by attaching the sides to the bottom panel using screws or nails. Then, add the top panel and secure it in place. Finally, attach the back panel to complete the structure.
- Install Paneling: To give your cabinet a polished look, install paneling that matches your room’s decor. This can be done by attaching thin wood panels or veneer to the exterior of the cabinet.
- Add Trim: For a more finished appearance, add trim or molding around the edges of the cabinet. This not only enhances the look but also hides any seams or imperfections.
- Secure the Cabinet: Once the cabinet is assembled, position it in the desired location and secure it to the wall studs for stability. Make sure it’s level and properly aligned with the bed frame.
By following these steps, you’ll have a beautifully assembled cabinet that seamlessly integrates with your room’s design while providing a functional home for your Murphy bed.
Finishing Touches
Adding the final touches to your Murphy bed will enhance its appearance and functionality. Here’s what you can do:
- Sand and Smooth: Before applying any finish, sand the surfaces of the bed frame and cabinet to ensure they are smooth and free of splinters.
- Paint or Stain: Choose a paint or stain that complements your room’s decor. Apply it evenly to the bed frame and cabinet, following the manufacturer’s instructions for the best results.
- Add Hardware: Install handles or knobs on the cabinet doors for easy access. Choose hardware that matches the style of your room.
- Install Safety Locks: If desired, install safety locks to keep the bed securely in place when it’s folded up.
- Decorate: Add decorative elements such as molding or trim to the cabinet for a more finished look.
Installation
Securing your Murphy bed properly is crucial for safety and stability. Follow these steps:
- Locate Wall Studs: Use a stud finder to locate the studs in the wall where you’ll be mounting the bed.
- Attach Mounting Brackets: Secure the mounting brackets provided with your Murphy bed kit to the wall studs using long screws. Make sure they are level and properly aligned.
- Mount the Bed: With the help of another person, lift the bed frame and attach it to the mounting brackets. Ensure that it is securely fastened and can support the weight of the bed.
- Test the Mechanism: Carefully lower and raise the bed several times to test the mechanism. Make sure it operates smoothly and stays securely in place when folded up.
- Secure the Cabinet: If your Murphy bed includes a cabinet, make sure it is also securely attached to the wall studs for added stability.
By following these steps, you’ll ensure that your Murphy bed is safely installed and ready for use. Enjoy the added space and convenience it brings to your home!
Conclusion
Building a DIY Murphy bed is a smart way to maximize space and add a stylish element to your home. With careful planning, the right materials, and attention to detail, you can create a functional and attractive sleeping solution. Share your DIY Murphy bed experiences in the comments below!
FAQ’s
What is the average cost to build a Murphy bed?
The average cost to build a DIY Murphy bed ranges from $150 to $500, depending on materials and design complexity.
Can I use a regular mattress for a Murphy bed?
Yes, you can use a regular mattress for a Murphy bed, but ensure it fits the bed frame and doesn't exceed weight limits.
How much space do you need for a Murphy bed?
You'll need a wall space at least the width of the bed and enough room to extend the bed fully when in use.
Are Murphy beds comfortable to sleep on?
Murphy beds are as comfortable as the mattress you choose. Opt for a quality mattress for a comfortable sleep experience.
Do Murphy beds need to be anchored to the wall?
Yes, Murphy beds must be securely anchored to the wall to ensure stability and safety when in use.

I am Sammy and I blog at Live it. Love it. Make it. It is creative lifestyle blog run by best friends H and Sammy. Head over and follow our crafty adventures!