Ever wondered how you can unleash your creativity and make stunning bead art that captivates? This article is your gateway to mastering the simple yet profound techniques of bead art. Dive in to transform tiny beads into mesmerizing, colorful designs!
How to Make Bead Art: Select beads and a pattern. Thread your needle and string beads according to the pattern. Secure each row by looping the thread around the preceding one. Finish by tying off the thread.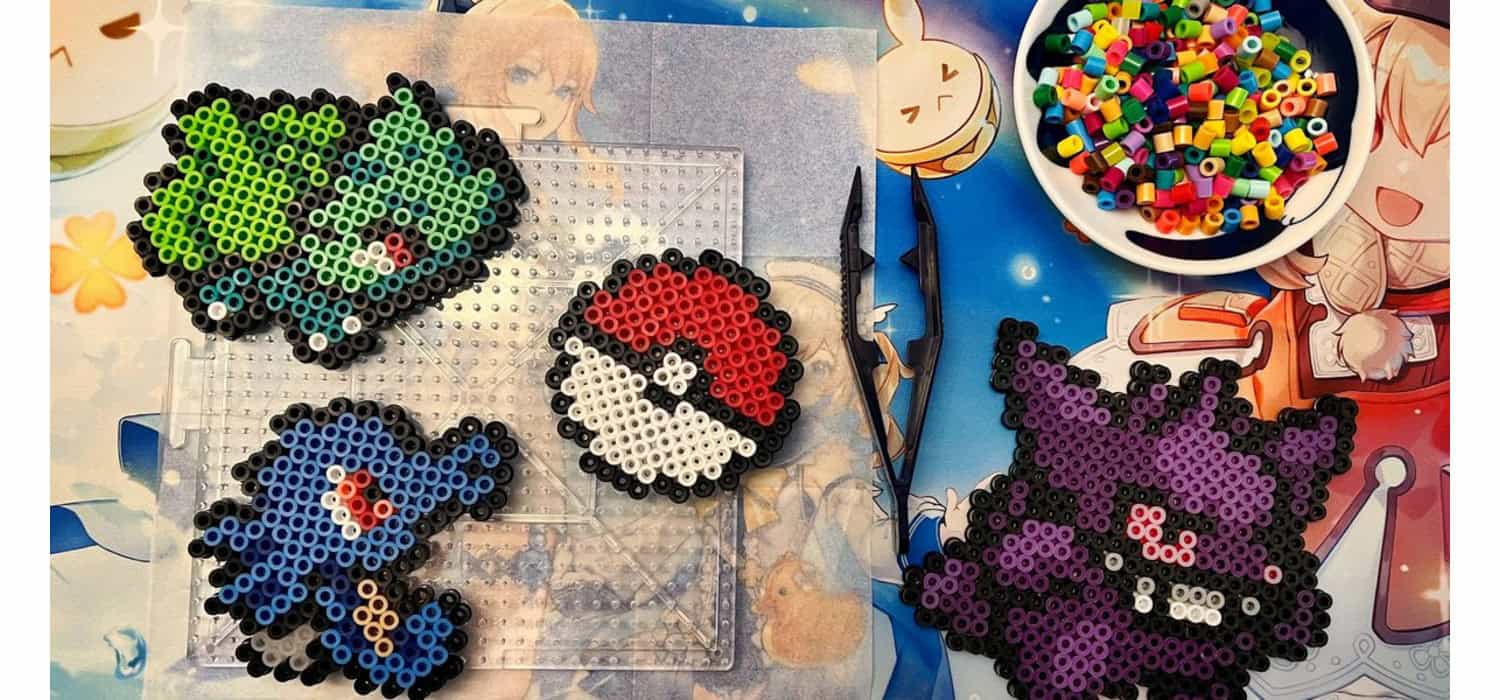
Don’t stop here! Continue reading to unlock detailed step-by-step guides, expert tips, and creative ideas that will elevate your bead art skills. Start your artistic journey today and create wonders! Want to Make Artificial Grass? Click here!
Essential Tools for Bead Art
To dive into the world of bead art, you need the right tools in your arsenal. Here’s a breakdown of essential items and tips on selecting the best for different projects.
Needles: Your Bead Art Best Friends
Needles are crucial for bead art. Opt for a size that matches your beads. Smaller beads require finer needles. The key is precision; a perfect match ensures smooth threading without breaking the beads.
Thread: The Backbone of Beadwork
Selecting the right thread can make or break your project. Nylon threads are durable and flexible, ideal for most beadwork. For heavier beads, consider thicker threads to ensure durability and ease of use.
Scissors: Clean Cuts Every Time
A good pair of scissors is indispensable. Look for ones with fine tips to achieve precise cuts. Sharp scissors are a must to avoid fraying your thread, keeping your work neat.
Pliers: For the Finishing Touches
Pliers are not just for wire work; they can help tighten knots and trim excess wire or thread. Needle-nose pliers are especially useful for fine adjustments and can reach into tight spaces.
Also read: How to Make Balloons Shiny DIY
Selecting Tools: A Strategic Approach
When selecting tools, consider the material and size of your beads and the complexity of your projects. For intricate patterns, prioritize precision tools. Experiment with different tools to find what feels right in your hands, as comfort is key to enjoyable and successful beadwork.
Investing in quality tools not only makes the process smoother but also elevates the final look of your bead art. Equip yourself properly, and you’re halfway to creating beautiful, intricate bead designs that are bound to impress.
Basic Beading Techniques
To excel in bead art, mastering a few fundamental techniques is essential. Here’s a guide to peyote stitch, brick stitch, and loom beading, along with tips for beginners.
Peyote Stitch: The Building Block of Beadwork
Peyote stitch is beloved for its versatility. Start by threading an even number of beads, pass the needle back through every second bead, and continue in this zigzag pattern. The result is a tight, even fabric of beads, perfect for creating intricate patterns and designs.
Brick Stitch: Strong and Decorative
Begin your brick stitch with a foundation row of ladder stitch. Add each subsequent row by looping the thread through the space between beads in the previous row, anchoring your new bead on top. This technique allows for sturdy, decorative edges and is ideal for making earrings and embellishments.
Loom Beading: Efficient and Uniform
Loom beading involves stretching threads across a loom and weaving beads between them. This method is efficient for producing large, uniform pieces like bracelets and belts. Thread your beads in a row, pass the needle under the warp threads, and loop it back over to secure the beads.
Tips for Beginners
- Start Small: Begin with small projects to familiarize yourself with different stitches.
- Practice Consistency: Focus on maintaining even tension and consistent bead size to ensure uniformity in your work.
- Use High-Quality Materials: Invest in good-quality beads and thread to make the learning process smoother and the results more satisfying.
- Be Patient: Each technique requires patience. Take your time to learn the movements and build muscle memory.
With these techniques and tips, you’re well on your way to becoming proficient in the art of beadwork. Each stitch offers a unique texture and style, allowing you to express your creativity through various designs.
Also read: How to Make a DIY Bird Feeder
Setting Up Your Beading Workspace
Creating an efficient workspace is key to enhancing your beadwork experience. Here are tips on how to organize your beads and tools and make your workspace conducive to creativity.
Sort and Store
Divide your beads by color, size, and type. Use clear, stackable containers with compartments to keep them organized and easily visible. This setup not only saves time but also inspires new project ideas by clearly displaying your options.
Tool Organization
Keep your most used tools like scissors, needles, and pliers within arm’s reach. Magnetic strips or small cups can hold these tools securely and prevent them from getting lost.
Adequate Lighting
Good lighting is crucial for beadwork to avoid eye strain and ensure precision in your designs. Opt for a bright, adjustable desk lamp that can illuminate your workspace without creating shadows.
Comfortable Seating
Invest in a comfortable chair with good back support. Adjust the height to ensure that your work surface is at a comfortable level, reducing strain on your back and neck.
Minimize Distractions
Keep your workspace clutter-free and designate this area solely for beading. A tidy and dedicated space helps maintain focus and boosts creativity, allowing you to fully immerse in your craft.
With a well-organized and thoughtfully set-up workspace, you can enhance your efficiency and enjoy your beadwork projects to the fullest.
Designing Bead Art
The journey into advanced bead art starts with the right design and pattern selection. Each pattern you choose can transform simple beads into stunning pieces of art. Here’s how to navigate the world of designs and make effective choices.
Source Your Inspiration:
Start by exploring various sources for your bead art patterns. Look into traditional crafts, nature, or abstract art for inspiration. Platforms like Roseville Art offer a myriad of designs ranging from the simple to the complex, providing a good foundation for your projects.
Understand the Pattern Structure:
Before you start, understand the complexity of the pattern. Determine if it’s suitable for your skill level and if it meets the aesthetic you’re aiming for. Patterns can vary greatly in terms of technique and required time, so choose one that aligns with your goals and available time.
Use Design Software:
For those who want to create custom patterns, design software can be a valuable tool. Software allows you to visualize the finished piece and make adjustments before you start beading, saving time and materials.
Also read: How to Make a DIY Kite
Tips on Color and Bead Selection
Choosing the right colors and beads is crucial for the aesthetic appeal of your bead art. Here are some tips to help you select the best combinations.
Understand Color Theory
Basic knowledge of color theory can significantly enhance your beadwork. Use complementary colors for a vibrant effect, or analogous colors for a more harmonious look. Consider the emotional impact of colors—blues and greens are calming, while reds and oranges are energizing.
Contrast and Texture
Incorporate different bead sizes and finishes to add texture and depth to your work. Contrast matte with shiny finishes, or smooth with faceted beads to make your design pop.
Consider the Light
Remember that beads can look different under various lighting conditions. If possible, check how your beads look in natural light versus artificial light to ensure they match your vision.
Sample Your Work
Before committing to a large project, create a small sample to see how your beads and colors work together. This step can prevent costly mistakes and help refine your design.
By thoughtfully choosing your designs, patterns, colors, and beads, you can elevate your bead art projects from simple crafts to exquisite pieces of art. The key is to plan meticulously and understand the elements of design that resonate most with your creative vision.
Also read: How to Make a DIY Photo Booth
Projects You Can Try
Diving into bead art projects can be exciting and rewarding. Here are step-by-step guides for creating beaded jewelry, decorations, and functional items, alongside tips on incorporating beads into everyday objects for an added touch of beauty.
Beaded Jewelry: Earrings and Bracelets
Creating beaded jewelry is a fantastic starting point for both beginners and experienced crafters.
- Earrings: Start with simple drop earrings. Thread your choice of beads onto a headpin, arrange them to your liking, and finish by making a loop at the top with pliers. Attach to earring hooks, and your beautiful handmade earrings are ready to wear.
- Bracelets: For a stretchy beaded bracelet, string beads onto elastic cord. Experiment with colors and sizes for variety. Once you’ve threaded enough beads to fit your wrist comfortably, tie the ends securely and trim any excess.
Beaded Decorations: Window Hangings
Beaded window hangings catch light beautifully and add sparkle to any room.
- Start by selecting translucent beads for maximum light reflection. Thread beads onto a strong nylon thread or fishing line, creating strands of various lengths. Hang these strands from a wooden or metal rod and place in front of a window.
Functional Beaded Items: Coasters and Towel Holders
Functional items like coasters and towel holders can also be enhanced with beads.
- Coasters: Weave beads using a loom to create durable and colorful coasters. Choose a pattern or create your own with a bead design software. Once completed, bind the edges with a thin ribbon to prevent fraying.
- Towel Holders: For a decorative towel holder, bead a length of strong cord and attach loops at both ends for hanging. Integrate larger beads for a bold look, which can be practical yet stylish in your bathroom or kitchen.
Incorporating Beads into Everyday Items
To add a decorative touch to everyday items, consider these ideas:
- Beaded Curtains: Use beads to create custom door curtains. Choose beads that match your decor and string them in creative patterns.
- Decorative Plant Hangers: Integrate beads into macramé plant hangers for an extra decorative element. Use beads that complement the color of the pot or the plant.
- Cabinet Pulls: Update old cabinet pulls by threading beads onto the handles. This small change can make a significant impact on the look of your furniture.
With these projects, you can transform ordinary items into unique, handcrafted pieces that reflect your personal style and creativity. Whether you’re crafting jewelry, home decor, or functional items, beads provide endless possibilities for beautification and expression.
Also read: How to Make DIY Pins
Creative Challenges in Bead Art
Bead art, with its intricate patterns and delicate details, presents unique challenges, especially as the complexity of designs increases. Understanding these challenges and knowing how to overcome them can greatly enhance your crafting experience.
Managing Detail and Scale
One of the main hurdles in complex bead art projects is managing the scale and detail without losing the overall aesthetic. As designs become more intricate, keeping track of numerous tiny beads and their placement can become overwhelming.
- Solution: Use a detailed pattern grid and color-coded beads. Organize your workspace so that everything you need is within reach and clearly labeled. Take breaks to step back and view your work from a distance, ensuring the pattern is emerging as intended.
Time and Patience Requirements
Complex beadwork requires significant time investment and patience. Larger or more detailed projects can take days, if not weeks, to complete.
- Solution: Set realistic goals and break the project into manageable sections. Celebrate small milestones to keep your motivation high. Remember, bead art is not a race; it’s a form of relaxation and creative expression.
Also read: How to Make a DIY Pop It
Encouraging Creativity and Personal Expression
Beyond the technical challenges, bead art offers a fantastic canvas for personal expression and creativity.
Experiment with Materials
Don’t limit yourself to traditional beads. Experiment with different materials like glass, wood, or metal beads. Each material can add a unique texture and character to your artwork.
Create Personalized Projects
Incorporate elements that are meaningful to you into your designs. Whether it’s using colors that resonate with your mood or patterns that reflect your heritage, personal touches make each piece uniquely yours.
Push Your Boundaries
Challenge yourself by stepping out of your comfort zone. Try new techniques or larger projects. Each new skill you learn will open the door to more creative possibilities.
Bead art, with its blend of technical skill and creative expression, is a fulfilling endeavor. By tackling the challenges and embracing the vast possibilities for creativity, you can transform simple beads into personal and expressive art pieces that stand out. Are lips not shining anymore? Click here!
Also read: How to Make a DIY Shirt
FAQ Section
What is the easiest bead stitch for beginners?
The peyote stitch is ideal for beginners, offering a simple yet versatile technique. It's perfect for creating flat pieces or tubes, making it a foundational skill in beadwork.
How do you finish off beadwork neatly?
To finish beadwork neatly, weave the tail thread back through several beads, tie secure knots where hidden, and trim any excess thread carefully. This ensures a clean, professional look.
What materials are used for making beads?
Beads can be made from a variety of materials including glass, plastic, metal, wood, and stone. Each material offers unique textures and colors for creative beadwork projects.
Can bead loom patterns be used in other bead stitches?
Yes, bead loom patterns can often be adapted for use in other techniques like peyote or brick stitch, with some adjustments to the pattern to fit the stitch style.
How to choose the right size beads for a project?
Consider the design’s detail and the project's overall size. Larger beads work well for bold, less detailed designs, while smaller beads are better for intricate, detailed artwork.
Also read: How to Make a DIY Smoke Buddy
Conclusion
Embrace the art of beadwork to express creativity and hone precision. From selecting the perfect beads and mastering basic stitches to tackling advanced projects, beadwork offers endless possibilities for personal expression and creativity. Share your bead art creations and tips with our community to inspire and learn from each other! Make your own Fairy Wings with us!
Also read: How to Make a DIY Vending Machine

I am Sammy and I blog at Live it. Love it. Make it. It is creative lifestyle blog run by best friends H and Sammy. Head over and follow our crafty adventures!