Discover the secrets of creating iconic Andy Warhol-style pop art! Whether you’re an aspiring artist or a curious creator, mastering this vibrant technique will elevate your artistic skills. Our guide demystifies the process, ensuring you can replicate Warhol’s famous style effortlessly. Dive in now and unleash your creative potential!
How to Make Andy Warhol Pop Art:
Choose a striking, high-contrast photo. Convert it into four quadrants. Apply bold, contrasting colors to each section. Use simple editing software or apps like Adobe Photoshop for best results.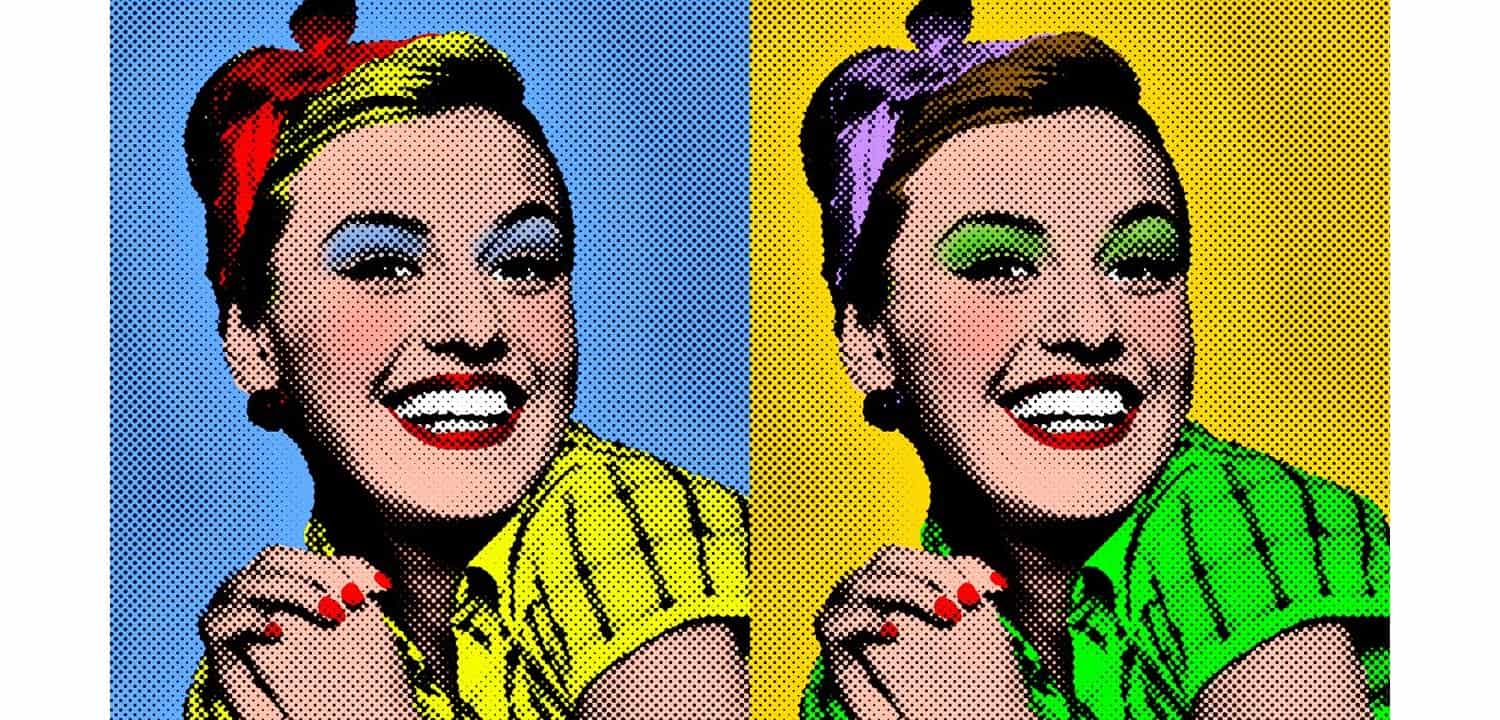
Don’t stop here! Unlock your full artistic prowess by exploring detailed techniques and expert tips in the following sections. Transform ordinary images into extraordinary pop art masterpieces today!
Materials Needed
To create your own Andy Warhol-inspired pop art, you’ll need the following:
Traditional Materials
- Canvas or thick paper: Ideal for acrylic or oil painting.
- Acrylic paints: Choose bright, vivid colors.
- Brushes: Various sizes for different strokes.
- Pencil: For sketching your design.
- Eraser: To correct any sketching mistakes.
Digital Tools
- Graphic tablet: Provides more control for digital drawing.
- Adobe Photoshop or GIMP: Software for editing and color manipulation.
- Scanner: If starting with a hand-drawn sketch.
Each tool plays a crucial role in achieving the distinct, colorful look of Warhol’s art. Whether you choose traditional or digital methods, these materials will help you produce stunning, vibrant pieces that capture the essence of pop art.
Digital Creation Using Photoshop
Creating Andy Warhol-style pop art digitally revolves around selecting the right image and manipulating it with colors and effects. Here’s how you can achieve this using Adobe Photoshop:
Select and Prepare Your Image
- Choose an Image: Opt for high-contrast portraits with clear features.
- Open in Photoshop: Load your chosen image into Photoshop.
- Desaturate: Convert the image to grayscale by navigating to Image > Adjustments > Black & White.
- Increase Contrast: Enhance contrast to make the features more distinct (Image > Adjustments > Brightness/Contrast).
Applying Color Layers
- Duplicate Layer: Start by duplicating the grayscale image layer.
- Select Areas: Use the ‘Quick Selection Tool’ to select areas where you want to apply color.
- Create New Layer: For each selection, create a new layer and fill it with a solid color.
- Blend Modes: Experiment with different blend modes for each color layer to see what stands out. ‘Multiply’ or ‘Overlay’ can offer vibrant effects.
Techniques for Color and Effects
- Color Choices: Choose bold, pop-art colors—bright reds, deep blues, vibrant yellows.
- Apply Effects: To mimic Warhol’s screen print effect, go to Filter > Filter Gallery > Cutout. Adjust the number of levels and edge simplicity to get a more abstract look.
- Detailing: Add details like shadows or highlights using the ‘Brush Tool’ on low opacity.
Creating Multiple Variants
- Duplicate Finished Art: Once your first image is complete, duplicate it.
- Adjust Colors: Change the color layers in each duplicate to create different versions. This mimics Warhol’s technique of repeating the same image in various vibrant colors.
- Layout Design: Arrange your images in a grid pattern similar to Warhol’s Marilyn Monroe series for visual impact.
By following these steps, you can transform any portrait into a piece of Warhol-inspired pop art. The key is to experiment with colors and effects to find what best represents your creative vision. This technique not only pays homage to Warhol’s iconic style but also adds a modern twist to your digital artwork.
Using AliveColors Software
AliveColors is a versatile software that caters to both novice and professional artists looking to dive into digital art creation. If you’re aiming to replicate Andy Warhol’s pop art style, here’s a detailed tutorial on using AliveColors to achieve vibrant and impactful results.
Setting Up Your Project
- Launch AliveColors: Start by opening AliveColors on your computer.
- Create New Project: Go to File > New to open a new canvas. Choose a size that suits your artwork.
- Import Image: Import the image you wish to transform by going to File > Open, or simply drag the image into the workspace.
Selecting the Right Tools
- Layers Palette: Familiarize yourself with the Layers Palette as you will manage your artwork here.
- Selection Tools: Use selection tools such as the ‘Magic Wand’ or ‘Lasso’ to isolate parts of the image for coloring.
- Adjustment Tools: Access these under the Image menu for modifying contrast, brightness, and saturation.
Applying Adjustments for Pop Art
- Desaturate the Image: Convert your image to grayscale to simplify the process of applying new colors. This can be done under Adjustments > Desaturate.
- Increase Contrast: Use the ‘Levels’ or ‘Curves’ tool to make the darks darker and the lights lighter, enhancing the overall contrast and making the image more dynamic.
Adding Pop Art Effects
- Layer Creation: For each area you want to color, create a new layer. This will keep your work organized and flexible.
- Apply Base Colors: Fill these areas with solid, bold colors using the ‘Paint Bucket Tool’.
- Add Pop Art Filters: Navigate to Effects > Artistic where you can find filters like Halftone, Posterize, and Comic Style. These effects can be adjusted to fit your artistic vision.
- Blend Modes: Experiment with different blend modes for each color layer (e.g., Multiply, Screen) to see how they interact with the base image.
Final Touches
- Adjust Layer Opacities: Tweak the opacities of your colored layers to blend the colors naturally with the image.
- Arrange Your Canvas: If you’re creating multiple variations like Warhol’s famous series, arrange your colored images in a grid pattern on your canvas.
This tutorial should guide you through using AliveColors to create pop art that not only captures the essence of Andy Warhol’s iconic style but also brings a personal touch to your digital creations. Enjoy the process of experimenting with colors and effects to create your unique artwork!
Creating Pop Art Online
In the digital age, creating Andy Warhol-style pop art doesn’t require sophisticated software; numerous online tools can help you achieve this effect with ease. Here’s an overview of some popular online platforms that offer quick Warhol effects, along with tips on selecting the right tool and customizing your artwork.
Online Tools for Warhol Effects:
- BeFunky: This online photo editor includes a “Pop Art” filter under the Artsy section, allowing you to convert photos into Warhol-inspired art instantly.
- Fotor: Known for its simplicity, Fotor offers a range of artistic effects, including pop art filters that mimic the vibrant, repetitive style of Warhol.
- ConvertImage: ConvertImage.net allows you to apply the ‘Andy Warhol Effect’ directly to your images, transforming them into multi-colored pop art pieces.
Selecting the Right Tool:
- Ease of Use: Choose a tool that is user-friendly and does not require a steep learning curve.
- Quality of Effects: Preview the effects if possible to ensure they meet your expectations for pop art style.
- Output Options: Check if the tool supports high-resolution outputs if you plan to print your artwork.
Customizing the Output:
- Adjust Colors: Many tools allow you to customize the colors used in the Warhol effect. Experiment with different palettes to match your creative vision.
- Tweak Settings: Adjust settings like contrast, saturation, and brightness to enhance the overall impact of the art.
- Preview and Modify: Utilize the preview function to see the effects in real-time, making adjustments as necessary before finalizing the image.
Using these online tools, you can create striking pop art in the style of Andy Warhol with minimal effort. Whether you’re looking to decorate your home, design unique gifts, or simply explore your artistic capabilities, these platforms provide an accessible and enjoyable way to engage with digital art creation.
Physical Creation Techniques
Replicating Andy Warhol’s iconic pop art style using physical materials involves a combination of stencil-making and screen printing. Follow these steps to create your own Warhol-inspired artwork:
Selecting and Preparing Your Image
- Choose a High-Contrast Image: Opt for a portrait with distinct features and strong contrasts.
- Print the Image: Print the image onto a transparent film or transfer it to a stencil-making material.
Creating Stencils
- Stencil Material: Use a sturdy material like acetate or cardboard for durability.
- Trace and Cut: Place your printed image over the stencil material and carefully trace the outlines. Use a sharp knife to cut out the shapes, creating your stencil.
- Multiple Stencils: For Warhol’s signature style, create multiple stencils for each color you plan to use in your artwork.
Screen Printing
- Prepare Your Screen: Stretch a mesh screen over a frame, ensuring it is taut and secure.
- Attach Stencil: Place your stencil on the screen and secure it in place using tape or adhesive.
- Apply Ink: Use a squeegee to spread ink over the stencil, ensuring it covers the entire design.
- Printing Process: Gently lift the screen to reveal your printed image. Repeat this process for each color, aligning the stencils carefully to create a layered effect.
Layering Colors
- Registration Marks: Use registration marks on your screen and stencil to ensure proper alignment when layering colors.
- Dry Between Layers: Allow each layer of ink to dry completely before applying the next color to prevent smudging.
By following these steps, you can replicate Warhol’s iconic pop art style using traditional stencil-making and screen printing techniques. Experiment with different colors, images, and layering to create your own unique Warhol-inspired masterpieces.
Tips and Tricks
Creating Andy Warhol-style pop art is a creative and enjoyable process, but there are some additional tips and common pitfalls to keep in mind:
Enhancing the Final Look:
- Experiment with Colors: Warhol’s art is known for its vibrant color palette, so don’t be afraid to use bold, contrasting colors to make your artwork pop.
- Texture and Depth: Add texture to your artwork by using different brushes or techniques. This can add depth and interest to your piece.
- Try Different Techniques: Don’t limit yourself to one technique. Mix and match digital and traditional methods to create unique effects.
- Frame Your Artwork: Consider framing your finished artwork to give it a polished, professional look.
Common Mistakes to Avoid:
- Overcrowding: Avoid overcrowding your artwork with too many elements. Warhol’s art is known for its simplicity and boldness.
- Ignoring Composition: Pay attention to the composition of your artwork. Balance the elements to create a visually pleasing result.
- Skipping Preparatory Work: Preparation is key. Take the time to prepare your image and materials properly before starting your artwork.
By following these tips and avoiding common mistakes, you can enhance the final look of your pop art and create stunning pieces that capture the essence of Andy Warhol’s iconic style.
FAQ Section
Q1: How can I create pop art like Andy Warhol?
A1: To create pop art like Andy Warhol, select a high-contrast image, desaturate it, and apply bold, vibrant colors using software like Adobe Photoshop or online tools such as BeFunky.
Q2: What materials do I need for creating pop art?
A2: For traditional pop art, you'll need canvas, acrylic paints, brushes, and a pencil. For digital pop art, you'll need a computer, graphic tablet, and editing software like Adobe Photoshop.
Q3: Can I create pop art without artistic skills?
A3: Yes, you can create pop art without artistic skills using online tools that offer pre-made filters and effects. These tools simplify the process, allowing anyone to create pop art with just a few clicks.
Q4: How do I choose colors for my pop art?
A4: Choose bold, vibrant colors that contrast with each other. Warhol often used primary colors (red, blue, yellow) and neon colors to create striking and eye-catching pop art pieces.
Conclusion
In conclusion, creating Andy Warhol-style pop art is an exciting and creative process that allows you to explore your artistic side. Whether you choose to use digital tools or traditional methods, the key is to experiment with colors, textures, and techniques to create unique and vibrant artworks that capture the essence of pop art.

I am Sammy and I blog at Live it. Love it. Make it. It is creative lifestyle blog run by best friends H and Sammy. Head over and follow our crafty adventures!