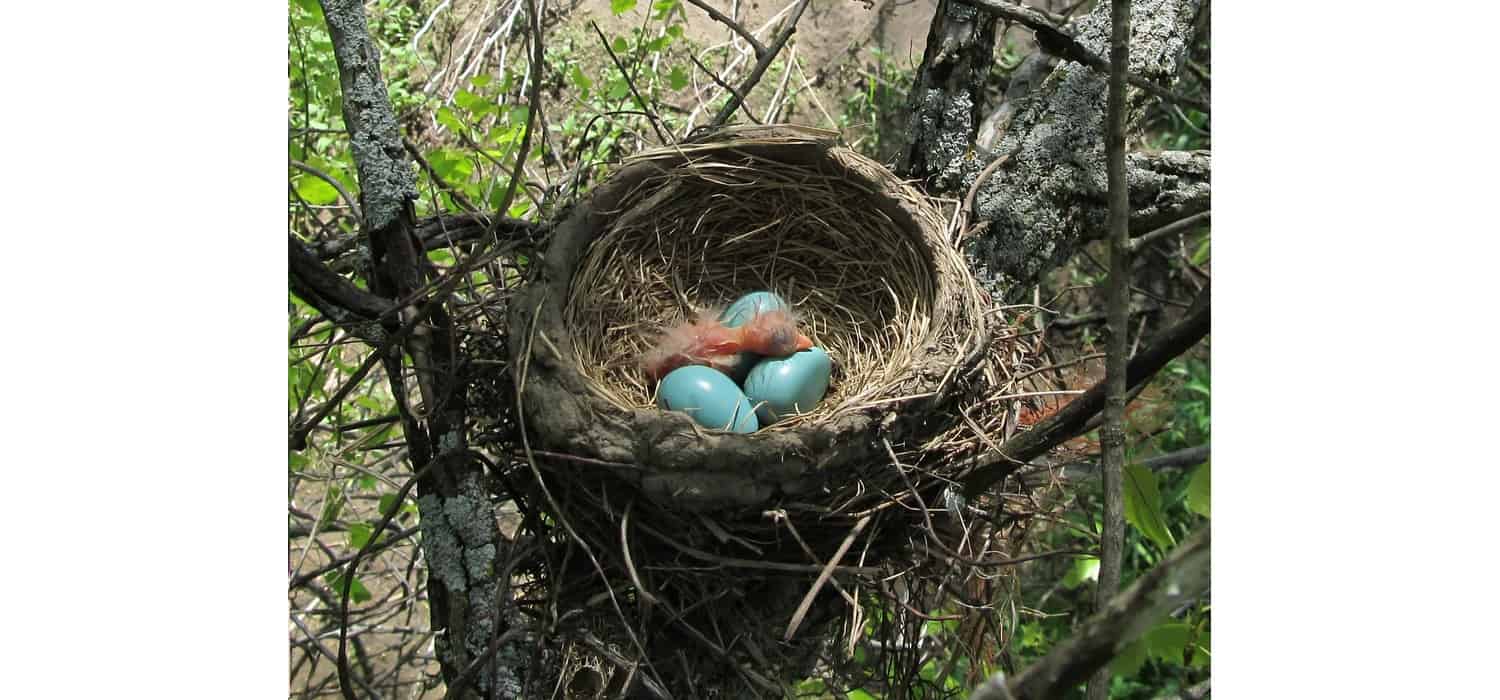
Are you tired of searching for the perfect guide on creating a bird’s nest? Look no further! This article will provide you with simple, step-by-step instructions to craft a cozy home for your feathered friends. Get ready to become a bird’s nest expert! Want the answer “How to Make a Birds Nest”? Gather natural materials like twigs, grass, and leaves. Form a circular base by intertwining the twigs. Add layers of grass and leaves for comfort. Shape the nest with your hands to create a snug bowl. Voilà, your bird’s nest is ready!
Key Takeaways
- Bird’s nests are not just homes; they’re engineering marvels tailored to each species’ needs.
- They provide safety, comfort, and a place to raise young birds.
- The materials and design of a nest can vary widely, from simple grass structures to elaborate mud and twig constructions.
Also read: How To Make A DIY Catapult
Understanding Bird’s Nests
- Birds use a variety of materials to build nests, including twigs, leaves, feathers, and even spider webs.
- The shape and size of a nest depend on the bird species and the location.
- Some birds, like eagles, reuse and add to their nests each year, making them larger over time.
The Science Behind Bird’s Nests
- The construction of a bird’s nest is instinctual, but it also involves some level of learning and adaptation.
- Nests are designed to provide insulation, camouflage, and protection from predators.
- The placement of a nest is strategic, with birds considering factors like temperature, humidity, and proximity to food and water sources.
Materials and Preparation
Gearing up to craft your own bird’s nest is an exciting venture that connects you with the intricate beauty of nature. Whether you aim for a functional nest to attract feathered friends or a decorative piece, selecting the right materials is crucial. Here’s a guide to help you gather everything you need, inspired by the insights from Nature Inspired Learning and Kippi at Home.
Natural Materials:
Gathering materials from nature not only makes your project eco-friendly but also gives it an authentic touch. According to Nature Inspired Learning, you should look for【8†source】:
- Long Dry Grass: Ideal for the structure’s outer layer.
- Short Grass: Helps to fill in and add density.
- Dried Leaves: Adds a natural cushioning for the base.
- Small Twigs: Provide structural support.
- Dried Foliage: Ferns, small leaves, or flower stems can add texture.
- Mud: Acts as a natural adhesive, binding the materials together.
Remember, the aim is to mimic the resourcefulness of birds, using what you find in your immediate environment. Ensure to have a pair of scissors for trimming, a basket or baggie for collection, and perhaps a bowl for shaping the nest and another for the mud.
Also read: How To Make A DIY Calendar
Alternative Materials for Decorative Nests:
For those crafting a nest as a decor element, Kippi at Home suggests using materials that might be more readily available or cleaner than what you might find outside:
- Clean Spanish Moss: A great base material that’s lightweight and pliable.
- Pine Straw: Offers a rustic aesthetic and texture.
- Moss: Adds a lush, green touch to your nest.
- Sticks: Essential for giving your nest structure and an organic feel.
Spray glue and a heat gun can be useful tools for these alternative materials, helping to bind the components and dry the glue quickly, ensuring your nest holds its shape.
Also read: How To Make A Diy Color On Led Lights
Tools and Supplies:
- Scissors/Snips: For cutting materials to the desired length.
- Spray Glue: Aids in binding materials together (for decorative nests).
- Heat Gun: Useful for quickly drying glue in decorative nests.
- Basket or Baggie: For collecting and transporting natural materials.
- Bowls: For holding mud or shaping the nest.
Building the Nest
After gathering all your materials, it’s time to embark on the creative journey of building your bird’s nest. This part of the article covers both the construction of natural and decorative nests, ensuring you have the guidance needed for whichever project you choose.
Alternative Materials for Indoor/Decorative Nests
For those looking to create an indoor or decorative nest, using alternative materials can provide both beauty and ease of construction. Based on Kippi at Home’s detailed crafting process【9†source】, here are the steps tailored for decorative nests:
- Start with a Base: Use clean Spanish moss or pine straw as your base. These materials are not only visually appealing but also mimic the natural bases used by birds. If using Spanish moss, ensure it is free from bugs for indoor use.
- Shape and Bind: Spray a small amount of glue on your base material to start forming the shape of your nest. Carefully shape the moss or straw into a round, nest-like form. Add more layers, spraying a bit of glue between layers to secure them.
- Incorporate Structure: Weave sticks into your base to add structure and authenticity to the nest. The sticks can be placed randomly or in a more organized pattern, depending on the desired look.
- Add Color and Texture: For a more vibrant nest, incorporate green moss or other colorful materials. This step is especially useful for decorative nests that aim to add a pop of color to home decor.
- Secure and Dry: Use a heat gun to dry the glue quickly, ensuring that the nest holds its shape. This step is crucial for decorative nests to maintain their form and integrity.
- Final Touches: If desired, add decorative elements such as faux eggs or small bird figures to complete the nest. These details can enhance the nest’s visual appeal and thematic relevance.
Step-by-Step Guide to Crafting Your Nest
Constructing a nest from natural materials gathered outdoors offers a hands-on experience to connect with nature. Inspired by the process outlined by Nature Inspired Learning, here’s how to craft your nest:
- Observation and Planning: Begin by observing real bird nests if possible, or use images as a reference. This step will give you insights into the structure and materials birds commonly use.
- Forming the Base: Use long dry grass to start forming the outer structure of your nest. You can create a base by twisting and weaving the grass into a circular shape.
- Adding Structure: Introduce small twigs and dried foliage to add stability and structure to the nest. These elements mimic the skeleton of a natural bird’s nest.
- Layering for Comfort: Place dried leaves and short grass inside the nest for cushioning. This layer makes the nest more comfortable and realistic.
- Securing with Mud: For a more authentic touch, use mud as a natural adhesive to bind the materials together. This step is particularly crucial for outdoor nests intended to be functional and withstand elements.
- Shaping and Drying: If necessary, use a bowl as a mold to shape your nest, ensuring it has the classic rounded form. Allow the nest to dry, especially if mud is used, to solidify its structure.
- Comparison and Adjustment: Once dry, compare your nest to the real or imaged ones you observed at the beginning. Make any necessary adjustments to improve its appearance and functionality.
- Decorating (Optional): For functional nests placed outdoors, consider adding materials that attract birds, like bits of yarn or fluff, to encourage them to visit or adopt the nest.
Creating a bird’s nest, be it for decorative purposes or to invite wildlife into your garden, is a fulfilling project that brings a piece of nature’s wonder into your life. Each step in the process, from gathering materials to the final touches, offers a chance to unleash creativity and gain a deeper appreciation for the natural world’s intricacies.
Decorative and Functional Aspects
Creating a bird’s nest, whether for decorative purposes or to attract real birds to your garden, involves both art and science. Adding aesthetic touches can transform a simple nest into a piece of decor, while understanding the functional needs of birds can help you create a welcoming environment for them. Here’s how to approach both aspects:
Adding Aesthetic Touches
For decorative nests, the beauty lies in the details. Following the crafting tips from Kippi at Home, here are some ways to enhance your nest’s visual appeal:
- Use of Color: Incorporate materials with different colors and textures, such as green moss or vibrant feathers, to add depth and interest to your nest.
- Varied Materials: Mix and match materials like pine straw, Spanish moss, and decorative elements (e.g., faux eggs or small bird figures) to create a unique look.
- Shape and Size: Experiment with the shape and size of your nest. While a traditional round nest is always in style, don’t be afraid to try oval shapes or even a more abstract form.
- Placement: Consider where your nest will be displayed. A nest can be a focal point when placed under a glass cloche or atop a stack of vintage books. Think creatively about how your nest can complement your existing decor.
Practical Tips for Outdoor Nests
If your goal is to create a nest that birds will use in your garden, functionality becomes as important as aesthetics. Inspired by the natural construction techniques discussed in the Nature Inspired Learning guide, here are some practical tips:
- Location, Location, Location: Place your nest in a sheltered location, away from predators and harsh weather. Ensure it’s accessible to birds but not too exposed.
- Natural Materials: Stick to natural materials that are safe and comfortable for birds. Avoid anything treated with chemicals or too fragile to withstand outdoor conditions.
- Stability and Security: Ensure your nest is securely anchored to prevent it from falling or being knocked over. Using mud as a natural adhesive can add weight and stability.
- Accessibility: Consider the size and entrance of the nest. It should be welcoming to the birds you aim to attract, not too large or too small.
- Maintenance: Outdoor nests may need occasional maintenance to remove debris or repair damages. Check your nest periodically to ensure it remains a safe haven for birds.
Whether crafting a nest for decorative purposes or to attract wildlife, understanding these decorative and functional aspects can greatly enhance your project’s success. Each approach offers its own set of challenges and rewards, allowing you to engage with nature and your creativity in meaningful ways.
Also read: How To Make A DIY Envelope
Conclusion
Embarking on the journey of creating a bird’s nest, whether for the joy of crafting, the beauty of home decor, or the love of nature, is a fulfilling endeavor that connects us with the intricate designs of the natural world. This project not only allows us to exercise our creativity and appreciation for beauty but also offers an opportunity to contribute positively to our local ecosystem by providing shelter for birds.
By understanding the various materials and techniques used in both decorative and functional nest building, as described by Nature Inspired Learning and Kippi at Home, enthusiasts can embark on this crafting journey with confidence. The process teaches us the importance of observation, the value of using natural resources, and the joy of creating something with our own hands that can either adorn our homes or aid wildlife.
Moreover, the project underscores the significance of mindfulness towards the environment. It encourages us to consider the sustainability of our crafting materials and the impact of our creations on the natural habitat of birds. As we weave together grasses, twigs, and moss, we’re reminded of the delicate balance of ecosystems and our role in preserving them.
In conclusion, making a bird’s nest is more than just a crafting project; it’s a lesson in ecology, a practice in mindfulness, and a testament to the beauty of nature’s designs. Whether you’re a seasoned crafter or a curious beginner, the experience of creating a bird’s nest offers a unique blend of artistic expression and environmental stewardship. Let your creativity take flight, and who knows, you might just find a feathered friend appreciating your work sooner than you think.
FAQ’s
What materials are best for crafting a DIY bird's nest?
Natural materials like long dry grass, small twigs, and dried leaves are ideal for crafting an authentic-looking bird's nest. These elements reflect the ecological crafting approach birds themselves use in nature.
How can I make my handmade nest durable for outdoor use?
Incorporate mud as a natural adhesive to bind your materials, mirroring the nest construction techniques of birds. This not only adds durability but also integrates an ornithology craft aspect into your project.
Are there eco-friendly alternatives for decorative indoor nests?
Yes, clean Spanish moss and pine straw offer sustainable options for decorative nests, aligning with ecological crafting practices. They provide a natural aesthetic while being environmentally friendly.
How can I attract birds to use the nest I made?
Place your nest in a sheltered area and include materials like soft grasses or yarn bits for comfort, following bird-friendly garden practices. This encourages birds to explore and possibly adopt the nest.
What are the benefits of making a bird's nest myself?
Crafting a bird's nest fosters a connection with nature, enhances your wildlife conservation efforts, and provides a creative outlet. It's an engaging way to support birdlife and embrace ecological crafting.

I am Sammy and I blog at Live it. Love it. Make it. It is creative lifestyle blog run by best friends H and Sammy. Head over and follow our crafty adventures!